My ultra-minimalist website: Taking things a giant step further with Hugo and Cloudflare Workers
Introduction Link to heading
The web is bloated. It’s a fact, and you probably experience this issue daily, with pages awfully slow to load, even on a good internet connection, or websites quietly killing your cellphone data plan. This is in great part due to the use of larger and larger images, huge javascript libraries, complex frameworks, and embed fonts. The direct consequence is a poor user experience, but even more problematic is the resulting massive environmental impact.
I work hard to fight this problem with my own clients daily by implementing modern tools and good development practices. But right here, on my own website, the possibilities are infinite! This is my very own test bench for new technologies. I was one of the first websites to use HTTP/2 a couple years ago with a web server I had to compile myself. My goal is always to offer an ultra-minimalistic experience, blazingly fast load times, excellent scores to popular benchmarks, and an environmental impact as low as possible.
Lately, I’ve been using WordPress 5.6, with an extremely minimal template (without any fonts, scripts, or libraries). My images were compressed and served either in WebP or SVG format, and I used lots of tweaks on my server to offer the best possible experience to my visitors (HTTP/2, Gzip, HSTS preloading, etc)
In 2019, I switched to OVH, one of the greenest hosting providers in Canada, which offers an extremely energy-efficient datacenter powered by hydroelectricity. I chose a VPS because I needed absolute freedom to tweak every possible configuration file, and install the software I wanted (Because hosting providers are extremely conservative, I always had to beg or wait months for things as simple as a PHP update).
The decision to use a VPS came at an environmental cost. While it provided me with absolute freedom when it came to server configuration, it meant that I was using resources even when nobody was visiting my website. It pained me to know that a whole operating system was running 24/7… just for my tiny minimalist website! Plus, I had 20GB of storage and around 600MB of RAM reserved at OVH all this time. That didn’t seem like a very good usage of resources.
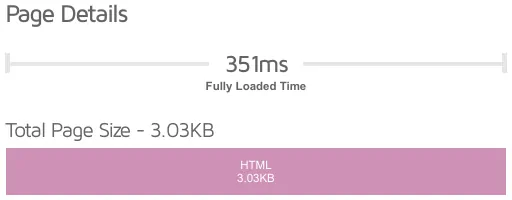
While pages were extremely light (a couple kBs each), WordPress was using of 190MB of storage. The whole setup used 3.1GB out of the 20GB offered by OVH.

It was time for a change…
Step 1 - Slimming down the website: From WordPress to Static with Hugo Link to heading
The obvious decision was to switch from WordPress to a static website. I had the chance to play with Hugo on a recent project and absolutely loved the ease of use and the option to create pages and articles using Markdown instead of HTML. It keeps gaining in popularity, and it is extremely efficient.
It took me 2 hours to migrate my small website to Hugo. Here are the steps I followed on my OVH server:
- Installed HUGO following this documentation. I used the package provided by my operating system (Ubuntu).
- Used the command
hugo new site devin my webroot to generate the proper folders needed for my new website - Downloaded a generic theme on https://themes.gohugo.io/ to familiarize myself with the way themes are built.
- Replaced the theme’s CSS with my WordPress theme’s CSS.
- Copied each page and article from the WordPress backend to markdown files (it is important to note that Hugo supports both Markdown and HTML).
- Created two languages and the corresponding menus in my Hugo configuration file.
- Tweaked a couple things in the layouts and CSS for the header and the footer (The newly-generated menu did not match perfectly with the WordPress theme CSS).
- Disabled stuff that I judged useless in the default header.
- Took some time to move and re-link the images, now located in the “static” folder of Hugo
A couple hugo commands later, my website was running perfectly! After checking that all my links were working fine, I decided to delete my WordPress install and copy the Hugo folders to the root of the website. Because there are no databases, redirections, or URL rewriting rules, this process took two minutes and was extremely easy.
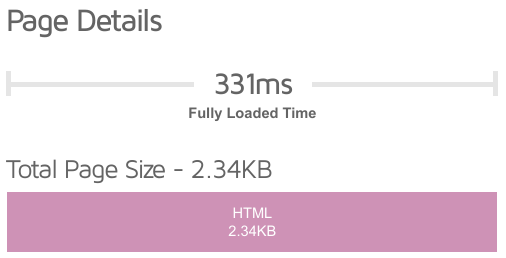
Here are the results!

Step 2 - Going serverless with Cloudflare workers Link to heading
Switching to a static website was the perfect opportunity to try Cloud Workers. Instead of having my own server, I would publish my website to a service able to replicate my tiny website to multiple servers around the world and serve this website when needed.
Not having a dedicated or virtual server comes with a lot of advantages.
- Because no resources are wasted because nothing is dedicated to my website (except the 371kb of disk space). Nobody visits the website means zero CPU, and zero megabytes of RAM.
- Workers are highly optimized, which means page load times should be smaller than what I am able to achieve on a VPS.
After hours of research, I settled on Cloudflare. I was already familiar with the functionalities offered (for free!) when you subscribe to the service (A free SSL certificate, relatively good SSL configuration options, HTTP/2, HTTP/3, etc). The main reason that made me choose their service is that they have a team of passionate people dedicated to making new technologies available as soon as they are available. They were one of the first companies to offer TLS1.3 back in 2016. They were also one of the first companies to make HTTP/3 available to all their customers in September 2019. It is really important to me because I know that even if I don’t have a VPS to compile a new version of Nginx/OpenSSL to play with new tech on my website, their service will still allow me to enjoy it.
The whole process of creating a worker and publishing a website took me one hour:
- I already had a Cloudflare account to manage my DNS zone. All I had to do was to login into the dashboard and create a new Worker.
- Because I was about to delete my VPS, I decided it was best to copy my Hugo website locally to my PC (instead of publishing from my VPS to Cloudflare)
- I followed This tutorial to install NodeJS, NPM, and Wrangler on my PC.
- I launched the command
wrangler loginto create the API key and link Wrangler to my Cloudflare worker. - Then,
wrangler generate my-workergenerated the files necessary for my website - I entered the name of my worker and the path to the folder containing the website’s files in the newly generated wrangler.toml configuration file.
- All I had left to do was to publish the website by entering
wrangler publish
This process took 10 minutes, but I spent much more time trying to figure out why my website wasn’t accessible after publishing (SSL protocol error). As it turns out, creating a route from the domain name to the Cloudflare Worker does not automatically adjust the DNS zone. I ended up finding a forum post indicating that users are supposed to create a DNS entry with an IP in a certain range. The recommended address was 192.2.0.1.
I also had to create a Page Rule to redirect the non-www traffic to florianschmitt.tech
After these adjustments, my website was accessible and ready to benchmark… Hold on to your hats!
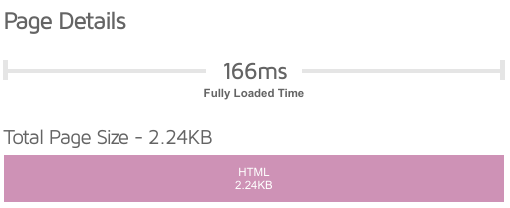
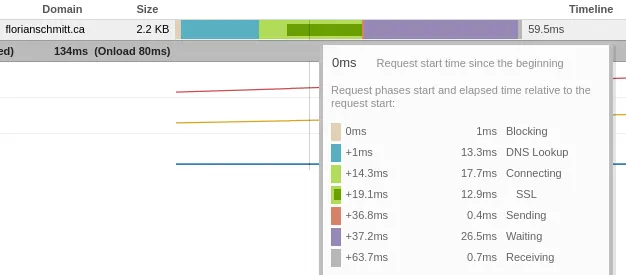
Wow, that is fast! I knew I would gain a little by switching to a static website on a Worker, but I never imagined it would be 50%! When analyzing the connection steps via GTMetrix, I realized that the SSL connection times were much smaller than on my VPS. This is logical because of the use of both edge computing, and because the DNS zone and the Worker are both managed by Cloudflare, at the same location, with probably a lot of optimization! The SSL connection that took 130ms in the past now takes only 17.7ms!
The results! Before and after Link to heading
The switch to serverless brought a long list of improvements:
- Free hosting (Cloudflare offers a free plan that allows 100,000 daily requests)
- No more server updates
- No more WordPress updates
- No more WordPress plugin updates
- No more risks of exploits in the WordPress core or a plugin
- Language management way easier than what WordPress plugins offer
- The ability to write articles or pages using Markdown instead of HTML
- Better security (No more backend password + TOTP, no more server security to manage)
- Shorter TLS negotiation (Because the domain zone and worker are both offered by Cloudflare)
- Better performance, with the results you’ve been waiting for:

| Before | After | Difference | |
|---|---|---|---|
| Homepage size | 3.03KB | 2.24KB | -26.1% |
| Homepage fully loaded time (GTMetrix) | 351ms | 160ms | -54.4% |
| Homepage network load time (GTMetrix) | 273ms | 59ms | -78.4% |
| Number of files used by the website | 6244 | 79 | -98.7% |
| Disk space used by the website | 190MB | 380KB | -99.8% |
| Total disk space dedicated to run the website* (Includes OS and software) | 3.1GB | 380KB | -99.9% |
* “After” not taking into account the disk space used by the Worker’s software, shared between all users.
What is left to improve Link to heading
- SSL configuration can be ameliorated. While Cloudflare offers a very modern SSL configuration (as proved by the A+ result to the Qualys SSL Labs test), the key that is generated for the Universal SSL certificate is an EC-256 bit key (would have preferred EC-384).
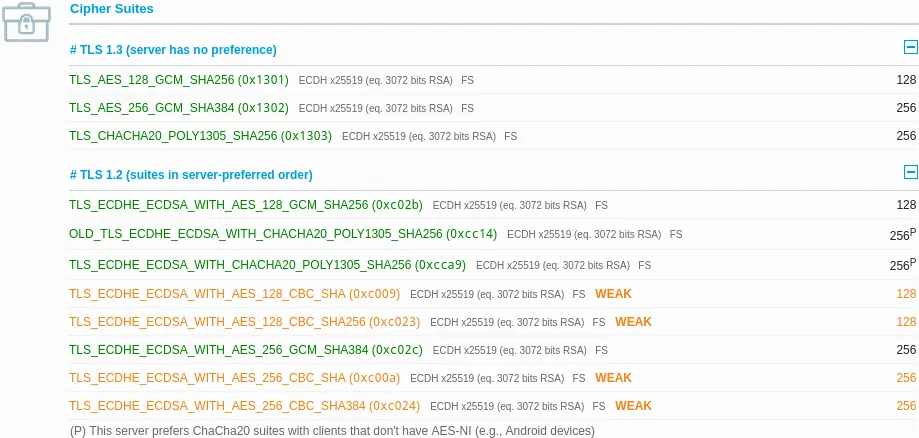
- Cipher suites: Cloudflare does not offer the option to choose the cipher suites offered when connecting to the website. The TLS1.2 configuration is still offering cipher suites considered “Weak” by today’s standards (and the Qualys SSL test). Thus, the score to the “Cipher suites” test cannot exceed 90%. Cloudflare should at least add the option to disable CBC suites in their dashboard, or even better, disabling all CBC and 128-bit cipher suites.
- There doesn’t seem to be an “easy” way to manage a Worker. Publishing content to the website requires the use of Wrangler and Cloudflare’s API. Things as simple as checking logs can be very complex compared to regular hosting solutions where you can easily access error log files from a dashboard or a file on the server.
Conclusion Link to heading
While the whole process was extremely fast and easy, it is far from being accessible to junior devs and enthusiasts who’d like to easily set up a static website. I would love to see Cloudflare offering a “mini-websites” service similar to workers, but easier to use. I think way more people would be inclined to develop small static websites if they could upload their files directly in their Cloudflare dashboard without the use of an API or command-line functions.
In the meantime, Hugo + Workers seem to be the perfect solution for devs wishing to reduce their static website’s environmental footprint and drastically improve page load times. It was a pleasure to write this article entirely in Markdown, and I cannot wait to keep improving my website with the tools Hugo offers.
This article is not sponsored by anyone. Used in this article: GTMetrix, Hugo, Cloudflare Workers, Qualys SSL Labs